Showing posts with label experiment. Show all posts

Monday, May 16, 2011

stippling experiments

These aren't really experiments, I just called them that because it's a new method for me. These images are details of one drawing that I'm making using one inch squares as different fields, and each field has different rules for placement of dots using an ink pen on paper.
The bottom left square's rules were: place dots in a random array, continually assess the visual qualities of the dots for the emergence of tonal density or imagery, avoid overt imagery but make a pleasing formal arrangement. Basically, just doodle with dots.

The upper right square's rules were different, they were: place dots evenly until uniformly dark value is achieved. Eventually individual marks will leave pathways and subtle areas of extra density, without much focus.

I've got a dozen or so squares to fill with dots in various ways, and I think in the end this drawing will be a rewarding exercise and an interesting piece.

Saturday, September 18, 2010

New Drawing

This is a new way of working from the basic triangular array, using different values and precisely chaotic patterning; it's graphite and ink.

Sunday, August 29, 2010

Sketch of a sculpture

I wanted to just sit down and draw an object from life today, something I rarely do. For a model, I decided to use a tiny unfinished wax piece I made that will eventually be cast in metal.

I was intrigued by the idea of taking a sculpture based on my drawings, then depicting it again as a drawing, completing a cycle.

I'd like to build models just for drawing reference, then destroy them. That way I'd preserve a version of an object that once existed and never will again.

Sunday, August 15, 2010

Branching Blob


Continuing with my viscous branching experiments, this one is acrylic paint on glass.

Saturday, August 14, 2010

Branching Monoprints on Mirrors: Part 2

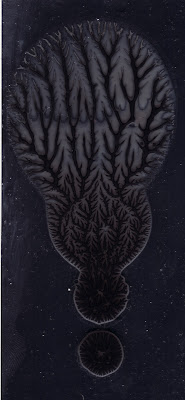
Here of some images of what these branch prints actually look like. It was difficult taking a picture of a thing on a mirror. I think when I do this for real I'm going do it on white glass or clear glass and then paint it white.


I'm not sure if these are actually monoprints. They are the plates and aren't ever printed onto anything else. I guess they are dried up potential monoprints.


These patterns are the result of simultaneous self-organization determined by the physical properties of the inks, plates and the force used to pull them apart. It's difficult to comprehend, especially since I'm used to intentional manipulation of my materials component by component, accumulating into something growing from a single point. These patterns happen everywhere all at once, as though each part knows exactly what every other part is doing and plans its position accordingly. But there is no planning, no deciding. Stuff just just does this, and it shows up everywhere in biology.


Friday, August 13, 2010

Branching Monoprints on Mirrors


I almost crapped myself when I figured out how to do this today. The right viscosity of ink pressed between two smooth surfaces that are then pulled apart sometimes creates perfect allover branches. I'm so excited to have the new super power of creating natural-looking branch patterns at will. If I can control this technique it sure will come in handy. These are done on mirrors, scanned in and unedited. My scanner makes mirrors look this dark automatically and I think it looks rad.

Tuesday, October 27, 2009

rubber bands

I only need to eat 10,000 more bunches of organic lacinato kale to give a true Tara Donovan-like experience.

Friday, September 11, 2009

glass


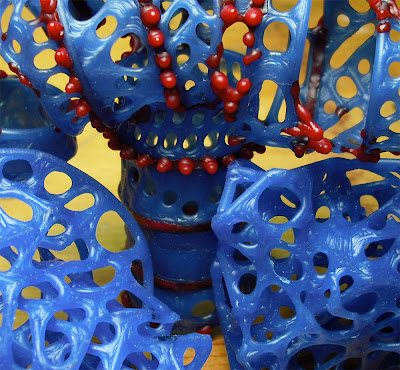
I just acquired some glass stringers (wires) and I'm using my little smithy torch to do some rogue lampworking. This is the first time I've ever worked with hot glass (besides sand casting) and it sure looks like it. This 2" tall "scholars rock" was a blast to make, I can't wait to make something that looks good.

Sunday, February 22, 2009

Roma Plastalina Part 2

My idea here was to sculpt the negative space around a bunch of building shapes, so the lowest level in clay becomes the top of a building once I pour plaster on and flip the thing over. This is my first layer:
I added about 5 layers total, each time adding and blending little snakes of clay  to incrementally build up the walls which become "streets" 
The clay I'm using is the softest grade of Roma Plastilina available, and I swear it's as soft as toothpaste. It's difficult to keep the edges crisp on these walls because they are about 1/8" wide and I sculpted this with a wooden knife and a knitting needle.

I like the clay negative shown here much more than this plaster relief. I just wanted to sculpt the negative space as an exercise, and design it in layers that change gradually.


Monday, February 16, 2009

Roma Plastilina

I'm making some clay models around which I will pour plaster, forming a relief. I'm trying to take some of the lattice, cell packing, geometric, branching, emergent and hierarchical patterns from my drawings and convert them back  into the 3rd dimension.

Friday, February 6, 2009

Crazy Waction


This is a detail of some wax work I'm building in collaboration with Ian Henderson. We call the method Exquisite Wax because we're working in the Exquisite Corpse fashion. This is just the beginning on my first turn. When I decide I'm done, I'll obscure  my wax with a water soluble wax, leaving parts exposed so he can add wax, and mail it to him. When he's done working, he'll do the same, and then we'll cast it in silver or bronze (but probably silver because it casts better with more definition). I also have a wax he sent me already but I'm not showing that one. Technically I shouldn't be posting this publicly because he might see it. It could be called a spoiler. That is why this image is so cropped, hopefully it is confusing. We certainly don't want him premeditating his design based on this. 


Saturday, January 3, 2009

Microscope Era

Yesterday I was given perhaps my coolest Christmas present ever from my brother in law Rob Sylvain-- a stereo microscope. It is small, lit by LEDs, and is rechargeable and portable, so I can take it into the "field".  It has magnifications of 10x or 30x, unless I change the eyepieces, but this is suitable for my purposes, mostly to look at 3d objects and textures in more detail. This morning I was messing around with it and I discovered that I can hold my little Fuji Finepix J10 camera up to the eyepiece and actually focus on the magnified image, and take fairly decent pictures. So I pulled out my box of oddities-insects that died in the car, bones I found in a friend's garden, seaweed pods, things lots of people like me have around, and I went at it.